Beta Address: http://blish.org/sdrdxdoc/sspdsp.html
5.11.10 - SSB DSP
- Tune to a band with active SSB signals, such as one of the 80, 40 or 20 meter ham bands.
- Wait until SdrDx has been running long enough for the scope, in mode, to have the S (lower white) signal trace travel all the way from right to left -- the original line all the way at the base of the scope needs to scroll completely off the left side of the scope.
- →Right-click and dragsliderto SSP Range 3. That's a range of about 1/2 an S-unit. Close the dialog.
- Right-click and ⇔ Trigger Margin
 = 5. Close the dialog.
 - Tune to a location near the desired signals that is quiet, no signals.
- →Left-click
- →Left-click to auto-set the trigger level.
That's the basic setup. You'll get a different effect if you click again; there are two operating modes, and each click on alternates between them, as well as setting the trigger level. →Left-click turns the processor on and off.
is DSP specifically intended for SSB communications. You'll find it most useful on signals that are somewhat noisy to start with and in situations where there are longer pauses between the signals that you can hear. One example of this is when a conversion is ongoing, but some parties to the conversation are relatively strong, and others are weak and/or not receivable.
also has an effect on the ultimate effect of -- Shorter DCY settings make for more noise in speech pauses, and in the pauses between transmitting parties, as the AGC will push the audio chain gain higher during low signal intervals. settings are made with AGG (AGGression) and TRG (TRiGgger.)
5.11.10.1 - At noise floor or above?
If you manually adjust TRG below the noise floor, then will not suppress the signal; it will only vary the audible DSP process. This is optimum for extremely weak signal copy as fading will not trigger suppression.
However, when signals are at least reasonably above the noise level, you may prefer to manually adjust TRG above the noise floor, or use the automatic adjustment if the noise floor is stable (no lightning, etc.) This allows to suppress the signal (according to the AGG setting) when active signals are not present.
set either above the noise level, or below it. If you set it at the noise level, the DSP will "pump" the signal as it constantly goes in and out of effect due to the noise constantly crossing the TRG threshold.5.11.10.2 - Automatic Adjustment
Tune to a nearby point on the current band with no signal. Press DEL or click on (SaMPle) and TRG will be set for you.
above or below the signal level found during the sampling period.Then tune to the desired SSB signal and adjust AGG until the signals sound best to you.
5.11.10.3 - Manual Adjustment
When the bands are noisy, you may find that automatic set with tends to sense lightning and other static bursts and consequently reduces its sensitivity further than you like. In such a case, you'll need to control the level yourself.
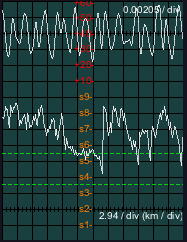
→Left-click to set the scope into the mode where the bottom trace displays the s-meter and AGC levels. →Left-click , and observe the lower dashed green line; using TRG adjust until that line is around the level of the minimum signal you wish to receive (you can refer to the s-unit calibrations on the scope to help with this.)
If the bands are relatively quiet, then you may prefer to approach manual setup this way: first tune to a nearby point on the current band with no signal. Set AGG all the way to the right and adjust TRG from the left towards the right until the indicator on just turns green and stays green. You may also observe the orange line on the scope, as long as you →Left-click first.
below the noise floor, the further below you go, the further into the less-processed DSP zone the signals move. So you can combine a high aggression setting with a lower TRG level to alter the DSP processing to suit you. In this, as with many aspects of SdrDx, experimenting can pay off very well.You can adjust the depth of the zone within which the DSP action occurs to an accuracy of 1 dBm within a range of 1/6th of an s-unit to 6 s-units (36 dBm.) To make this adjustment, →Right-click -- the range is indicated visually with a second (higher) green dotted line on the scope if the scope is in mode.
You can also adjust the zone depth using ^⇑ ↑ or ^⇑ ↓
5.11.10.4 - Using -Ri with SSP
Using with is highly recommended. will suppress a considerable amount of ringing that is an unwanted product of the DSP engine.
| toc | index | guide | changes | keyboard | , previous | . next |